Important DOS Commands

In DOS, many standard system commands were provided for common tasks such as listing files on a disk or moving files. Some commands were built into the command interpreter, others existed as external commands on disk. Over the several generations of DOS, commands were added for the additional functions of the operating system. In the current Microsoft Windows operating system, a text-mode command prompt window, cmd.exe, can still be used.

When you are using a Microsoft MS-DOS command prompt shell window, you can type the following commands into the window. Click a command shown below for a description of how to use that command.

  • cd : Change directory or display current directory path.
  • cls : Clear the window.
  • dir : Display list of contents of current directory.
  • help : Display list of commands or help about a command.
  • notepad : Run the Windows Notepad text editor.
  • type : Displays the contents of a text file.

Some other useful commands are:

  • assoc : Displays or modifies filename extension associations.
  • attrib : Displays or changes file attributes.
  • call : Calls one batch program file from another.
  • chkdsk : Checks a disk and displays a status report.
  • chkntfs : Displays or modifies the checking of disk at startup.
  • color : Sets the text and background colors.
  • comp : Compares the contents of two files or sets of files.
  • copy : Copies one or more files to another location.
  • date : Displays or sets the computer’s date.
  • del (or erase) : Deletes one or more files.
  • defrag : Defragment the specified storage device.
  • doskey : Display command history; define macros.
  • echo : Displays messages, or turns command echoing on/off.
  • edit : Runs the MS-DOS text editor.
  • exit : Closes the MS-DOS window.
  • fc : Compares two files or sets of files and displays the differences.
  • find : Searches for a text string in a file or files.
  • findstr : Search for a regular expression text string in a file or files.
  • goto : Used in a batch program file to jump to a particular line.
  • if : Used in a batch program file to perform conditional testing.
  • md (or mkdir) : Creates a directory.
  • more : Displays the contents of a file one screen at a time.
  • move : Moves one or more files from one directory to another directory.
  • rd (or rmdir) : Removes a directory.
  • rem : Used in a batch program file to identify comments.
  • ren (or rename) : Renames a file or files.
  • sort : Sorts input.
  • start : Starts a new window to run a specified program or command.
  • time : Displays or sets the computer’s time.
  • tree : Graphically displays the directory structure of a drive or directory.
  • xcopy : Copies files and directory trees.

The following internet related commands are not part of MS-DOS but can be typed at the MS-DOS command prompt:

  • arp : Displays ARP (address resolution protocol) translation tables.
  • ftp : FTP (file transfer program) to transfer files to/from server.
  • ipconfig : Displays internet configuration, including IP address.
  • netsh : Network services shell.
  • nslookup : Lookup IP address to/from domain name.
  • netstat : Displays current TCP/IP network connections and statistics.
  • ping : Ping the specified internet IP address or host name.
  • telnet : Starts a text-based telnet session to the specified host.
  • tftp : Transfers files to/from remote computer running TFTP service.
  • tracert : Traces the route to the specified IP address or host.

The following command are not part of MS-DOS and do not come with Windows but are available from third-parties. Some are equivalent to the Linux utility by the same name.

  • config : Defragment one or more files (rather than entire drive).
  • clip : Copy command output to Windows clipboard.
  • du : Displays disk usage for selected files or directories.
  • lynx : Text based web browser.
  • paste : Paste Windows clipboard to command input.
  • strings : Find all strings of a specified minimum length.
  • whois : Lookup domain ownership information.
Windows 98

Windows 98 (codenamed Memphis) is an operating system developed by Microsoft as part of its Windows 9x family of Microsoft Windows operating systems. It is the successor to Windows 95, and was released to retail on June 25, 1998. Like its predecessor, it is a hybrid 16-bit and 32-bit monolithic product with the boot stage based on MS-DOS.

Windows 98 is a heavily web-integrated operating system that bears numerous similarities to its predecessor, with most of the improvements being cosmetic or designed to improve the user experience, but there are a handful of features that enhance system functionality and capabilities. These include improved USB support and accessibility, as well as support for hardware advancements such as DVD players. It was the first Windows operating system to adopt the Windows Driver Model. It also introduced features that would become standard in future generations of Windows, such as Disk Cleanup, Windows Update, multi-monitor support, and Internet Connection Sharing.

Microsoft had marketed Windows 98 as a “tune-up” to Windows 95, rather than an entirely improved next generation of Windows. Upon release, it was generally well received for its web-integrated interface and ease of use, as well as for addressing issues that had been present in Windows 95, though users had pointed out that it was not significantly more stable than its predecessor. It saw one major update called Windows 98 Second Edition (SE) on May 5, 1999, and was succeeded by Windows Me in 2000. It sold an estimated 58 million licenses, and Microsoft ended mainstream support for both Windows 98 and 98 SE on June 30, 2002, and extended support on July 11, 2006.

Development of Windows 98

Following the success of Windows 95, development of Windows 98 began, initially under the development codename “Memphis.” The first test version, Windows Memphis Developer Release, was released in January 1997.

Memphis first entered beta as Windows Memphis Beta 1, released on June 30, 1997. It was followed by Windows 98 Beta 2, which dropped the Memphis name and was released in July. Microsoft had planned a full release of Windows 98 for the first quarter of 1998, along with a Windows 98 upgrade pack for Windows 95, but it also had a similar upgrade for Windows 3.x operating systems planned for the second quarter. Stacey Breyfogle, a product manager for Microsoft, explained that the later release of the upgrade for Windows 3 was because the upgrade required more testing than that for Windows 95 due to the presence of more compatibility issues, and without user objections, Microsoft merged the two upgrade packs into one and set all of their release dates to the second quarter.

On December 15, Microsoft released Windows 98 Beta 3. It was the first build to be able to upgrade from Windows 3.1x, and introduced new startup and shutdown sounds.

Near its completion, Windows 98 was released as Windows 98 Release Candidate on April 3, 1998, which expired on December 31. This coincided with a notable press demonstration at COMDEX that month. Microsoft CEO Bill Gates was highlighting the operating system’s ease of use and enhanced support for Plug and Play (PnP). However, when presentation assistant Chris Capossela plugged a USB scanner in, the operating system crashed, displaying a Blue Screen of Death. Bill Gates remarked after derisive applause and cheering from the audience, “That must be why we’re not shipping Windows 98 yet.” Video footage of this event became a popular Internet phenomenon.

Microsoft had quietly marketed the operating system as a “tune-up” to Windows 95. It was compiled as Windows 98 on May 11, 1998, before being fully released to manufacturing on May 15. The company was facing pending legal action for allowing free downloads of, and planning to ship Windows licenses with, Internet Explorer 4.0 in an alleged effort to expand its software monopoly. Microsoft’s critics believed the lawsuit would further delay Windows 98’s public release; it did not, and the operating system was released on June 25, 1998.

A second major version of the operating system called Windows 98 Second Edition was later unveiled in March 1999. Microsoft compiled the final build on April 23, 1999, before publicly releasing it on May 5, 1999. Windows 98 was to be the final product in the Windows 9x line until Microsoft briefly revived the line to release Windows Me in 2000 as the final Windows 9x product.

Windows 98 features

While Windows 98 was not as big as release as Windows 95, Windows 98 has significant updates, fixes, and support for new peripherals. Below is a list of some of its new features.

  • Protection – Windows 98 includes additional protection for important files on your computer such as backing up your registry automatically.
  • Improved support – Improved support for new devices and technologies such as ACPI, AGP, IEEE 1394, DVD, USB, and MMX.
  • FAT32 – Windows 98 has the capability of converting your drive to FAT32 without losing any information.
  • PnP – Improved PnP support, to detect devices even better than Windows 95.
  • Internet Explorer 4.0 – Includes Internet Explorer 4.0
  • Customizable Taskbar – Windows adds new features to the Taskbar such as Quick Launch that Windows 95 and Windows NT did not have.
  • Includes Plus! – Includes features only found in Microsoft Plus! free.
  • Active Desktop – Includes Active Desktop that allows for users to customize their desktop with the look of the Internet.
  • New background properties – You can now set *.bmp, *.pcx, *.jpg, *.gif, and *.htm files as your wallpaper (background).
  • Updated Microsoft Paint – The updated paint allows you to open *.bmp, *.pcx, *.jpg, and *.gif files.
  • Multiple monitor support – Windows 98 now supports multiple monitors on one computer.
  • Personal Web Server – PWS supports CGI (common gateway interface) and ISAPI (Internet Server Application Programming Interface) applications.
  • Improved floppy drive – Includes HSFLOP.PDR floppy disk driver that helps speed up access for many floppy disk drives.
  • Other Software – Includes Dr. Watson, Outlook Express, FrontPage Express, Windows Media Player, DirectX, NetMeeting, and more.

Scandisk, Control Panel, Taskbar, Toolbar

Microsoft ScanDisk (also called ScanDisk), is a diagnostic utility program included in MS-DOS and Windows 9x. It checks and repairs file systems errors on a disk drive, while the system starts.

Microsoft utility purchased from Norton, which is now Symantec, and included with MS-DOS 6.2 and later, as well as all versions of Microsoft Windows except Windows NT. ScanDisk is a software utility capable of checking the hard drive or floppy diskette drive for any disk errors. When errors are encountered, ScanDisk will mark those sections of the disk to help prevent information from further issues.

The program was first introduced in MS-DOS 6.2 and succeeded its simpler predecessor, CHKDSK. It included a more user-friendly interface than CHKDSK, more configuration options, and the ability to detect and (if possible) recover from physical errors on the disk. This replaced and improved upon the limited ability offered by the MS-DOS recover utility. Unlike CHKDSK, ScanDisk would also repair crosslinked files.

In Windows 95 onwards, ScanDisk also had a graphical user interface, although the text-based user interface continued to be available for use in single-tasking (“DOS”) mode.

However, ScanDisk cannot check NTFS disk drives, and therefore it is unavailable for computers that may be running NT based (including Windows 2000, Windows XP, etc.) versions of Windows; for the purpose, a newer CHKDSK is provided instead.

Control Panel

The Control Panel is a component of Microsoft Windows that provides the ability to view and change system settings. It consists of a set of applets that include adding or removing hardware and software, controlling user accounts, changing accessibility options, and accessing networking settings. Additional applets are provided by third parties, such as audio and video drivers, VPN tools, input devices, and networking tools.

The Control Panel has been part of Microsoft Windows since Windows 1.0, with each successive version introducing new applets. Beginning with Windows 95, the Control Panel is implemented as a special folder, i.e. the folder does not physically exist, but only contains shortcuts to various applets such as Add or Remove Programs and Internet Options. Physically, these applets are stored as .cpl files. For example, the Add or Remove Programs applet is stored under the name appwiz.cpl in the SYSTEM32 folder.

In Windows XP, the Control Panel home screen was changed to present a categorized navigation structure reminiscent of navigating a web page. Users can switch between this Category View and the grid-based Classic View through an option that appears on either the left side or top of the window. In Windows Vista and Windows 7, additional layers of navigation were introduced, and the Control Panel window itself became the main interface for editing settings, as opposed to launching separate dialogs.

Many of the individual Control Panel applets can be accessed in other ways. For instance, Display Properties can be accessed by right-clicking on an empty area of the desktop and choosing Properties. The Control Panel can be accessed from a command prompt by typing control; optional parameters are available to open specific control panels.

On Windows 10, Control Panel is deprecated in favor of Settings app, which was originally introduced on Windows 8 as “PC settings” to provide a touchscreen-optimized settings area using its Metro-style app platform. Some functions, particularly the ability to add and remove user accounts, were moved exclusively to this app on Windows 8 and cannot be performed from Control Panel.

Taskbar

The taskbar is an element of an operating system located at the bottom of the screen. It allows you to locate and launch programs through Start and the Start menu, or view any program that is currently open. The taskbar first introduced with Microsoft Windows 95 and can be found in all subsequent versions of Windows. It also allows them to check the date and time, items running in the background through the Notification Area, and with early versions of Windows access to the Quick Launch.

Toolbar

In computer interface design, a toolbar (originally known as ribbon) is a graphical control element on which on-screen buttons, icons, menus, or other input or output elements are placed. Toolbars are seen in many types of software such as office suites, graphics editors and web browsers. Toolbars are usually distinguished from palettes by their integration into the edges of the screen or larger windows, which results in wasted space if too many under populated bars are stacked atop each other (especially horizontal bars on a landscape oriented display) or interface inefficiency if overloaded bars are placed on small windows.

Files and Folder Management

A file is a collection of numbers which have been written to your computer’s hard drive. These numbers can be converted into a picture, a sound, text, or a set of instructions for a program to perform certain actions. A clue to a file’s type is given by its Icon or by its file extension. Folders are containers for anything on a computer including files and other folders. A path lists the folders that have to be opened to get to the required file.

Folders were called directories on older Microsoft systems.

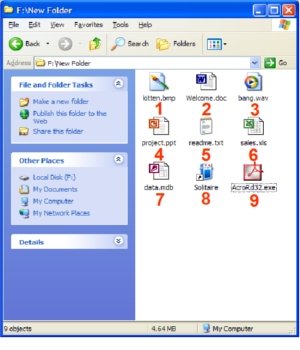
These are some typical file icons. They help the user to identify the file type. There are innumerable file types, some of the common ones are represented here:

  • .bmp – a bitmap image
  • .doc – a Word document
  • .wav – a sound file
  • .ppt – animated slides
  • .txt – plain text
  • .xls – a spreadsheet
  • .dbf – a database file
  • A shortcut (note the arrow)
  • .exe – an application (a program)

Windows allows you to view information about files in different ways. the icon view – the default used by Windows XP.

To change the icon view, click on View on the menu bar. Select the required view from the available list.

By default if a file type is a known one, such as a Microsoft Word Document, Windows won’t display its file extension. To view all file extensions click on Tools on the menu bar.

Various options can be configured. e.g. Display compressed files and folders with alternate colours. To display all file extensions, untick the Hide file extensions for known file types box.

File extensions are best left alone. Opening a file with the wrong application can sometimes damage the file. However you may at some stage need to change a file’s extension.

Folders

Each of these is a folder. They may contain files or other folders (called subfolders) or both. There may be many “nestings” of folders within folders.

Files and folders are located on the computer by using a file path. The “James” folder is located inside a folder called “Home”, which is located inside a folder called “es-net”, which is located on the “C:” drive. The file path will be “C:\es-net\Home\theintactone”.

Moving and Copying

To move a file or folder, either right click on its icon OR left click on the Edit  option on the toolbar. Choose cut to move or copy to copy!

At this point the item has been placed onto a clipboard – an area of memory accessible from nearly any application in Windows. Right click (or open Edit in the toolbar) in an open destination folder and choose “Paste” (or use drag and drop).

When an attempt is made to move an item between volumes, it is effectively copied, and the original remains.

Creating Files and Folders

This is mercifully easy. Simply right-click on some empty space in any suitable folder or the desktop and choose to create a new object from the choices offered.

Be careful not to alter the file extension, as this can render the file unreadable. File extensions are usually hidden for this reason.

Windows Explorer

Windows Explorer is the file manager used by Windows 95 and later versions. It allows users to manage files, folders and network connections, as well as search for files and related components. Windows Explorer has also grown to support new features unrelated to file management such as playing audio and videos and launching programs, etc. The desktop and the taskbar also form part of Windows Explorer. The look, feel and functionalities of Windows Explorer have been enhanced with each version of Windows.

Starting with Windows 8.0, Windows Explorer has been called File Explorer.

Windows Explorer replaced the programs File Manager and Program Manager that were used before Windows 95. In addition to file management, Windows Explorer also provides shell services as well as manages the desktop, the Start menu and the taskbar.

Windows Explorer should not be confused with Internet Explorer. The former is a file browser, whereas the latter is a Web browser. There are different ways to run Windows Explorer: one is by holding down the Windows button on the keyboard (the button with the Windows logo) and then pressing the “E” key. Another way is by clicking the Start menu and then “Run” and then typing in “explorer” in the dialog box that appears.

Starting with Windows 8, the Ribbon interface was introduced to Windows Explorer, now called File Explorer. This feature provides users with all the commands needed for file access and file management.

Where is Windows Explorer?

Windows Explorer is everywhere – yet finding Windows Explorer on the Start Menu is actually fairly difficult. We look at where Windows Explorer is, and some of the many other ways you can get to it.

Windows Explorer is both the hardest to find, and the easiest to find program there is. There are several ways to get it, and all of them are really, really easy.

First, the “expected” location:

  • Start menu
  • All Programs item
  • Accessories sub-menu
  • Windows Explorer menu item

Not obvious, but that’s typically where you’ll find it.

And for what it’s worth, I never, ever, use that location.

Here are some of the other ways you can get to Windows Explorer, most of them much easier than that:

  • If your keyboard has a “Windows Key”, then Windows+E brings up Windows Explorer.
  • Right click on My Computer, and click on Explore.
  • Folder with what?Click on Start, then Run, and enter in a folder name, like “C:”, and click OK – that will open up Windows Explorer (without the left hand navigation pane) on that folder.
  • Click on Start, then Run, and enter in “explorer /e,c:folder” where “c:folder” is replaced with the folder you want to view. This is roughly the same as the previous point, except that the left hand navigation pane is visible.

Finding Files and Folders

Can’t remember what you named a file or folder or where on your computer or storage media you saved it? You can open the Computer window to locate it or perform a Search.

  1. Choose Start→Computer.

The Computer window appears.

  1. Double-click an item to open it.

For example, you can double-click a USB drive, a CD-ROM drive, or your computer hard drive to open it.

  1. If the file or folder that you want is stored within another folder, double-click the folder or a series of folders until you locate it.

Depending on how you choose to display files and folders, you might see text listings, icons, or even thumbnail representations of file contents.

  1. When you find the file you want, double-click it.

If you can’t locate a file in the Computer window or in your Documents folder, you can perform a simple search for it.

  1. Open the Start menu and type a search term in the search box at the bottom.

A list of search results appears, divided by the location of the results.

  1. Click the See More Results link.

Additional search results appear in a window.

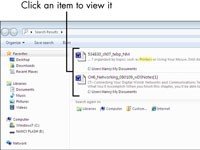
  1. Click an item to view it.

When you locate the file you want, you can double-click it to open it.

Formatting Disk, Copying Files, Printer Setting

Formatting Disk

Disk formatting is the configuring process of a data storage media such as a hard disk drive, floppy disk or flash drive for initial usage. Any existing files on the drive would be erased with disk formatting. Disk formatting is usually done before initial installation or before installation of a new operating system. Disk formatting is also done if there is a requirement for additional storage in the computer.

Disk formatting can be performed on both magnetic platter hard drives and solid-state drives. The formatting comprises low-level formatting, partitioning and high-level formatting. Low-level formatting aids in preparing the physical structure on the storage media. The partitioning process involves the division of the hard drive into logical volumes for data storage. High-level formatting helps in creating the file system format within the logical volume or within the disk partition. Disk formatting is usually done with the help of a disk formatting utility.

While preparing the hard drive for initial use, disk formatting checks for errors in the drive. It can scan and repair bad sectors. Another benefit associated with disk formatting is its capability to erase bad applications and remove sophisticated viruses.

Disk formatting is an action which must be done with caution. As it deletes data and removes programs installed, backup of the necessary data or applications are required. Disk formatting takes time. Frequent disk formatting can gradually decrease the life of a hard drive.

Copying Files

You can copy a file or folder (or groups of files or folders at the same time) to another location on your computer. When you do, the original file or folder stays in the same location, but a duplicate of it is copied to the location you indicate.

In Windows Explorer, select the file, folder, or groups of files and folders you’d like to copy.

You can select multiple files or folders in several ways:

Click the first file or folder you want to select, hold down the Ctrl key, and then click each additional file or folder you want. The selected files are highlighted, and the details pane displays the number of selected items. To unselect one of the selected files, click that file a second time. After selecting all your files, release the Ctrl key.

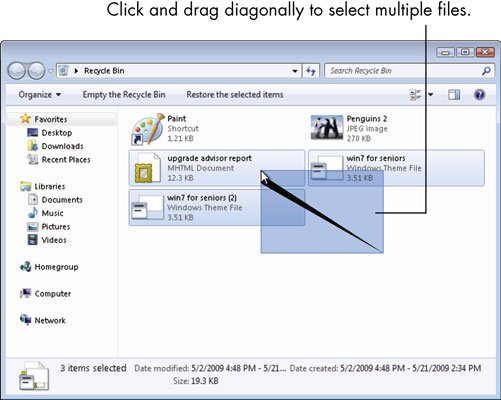
Click an empty part of the content area in Windows Explorer, hold down the left mouse button, and drag the mouse pointer towards the files you want to select. A selection box appears on-screen. Any file or folder that you touch with that selection box becomes selected. You don’t have to surround a file with the box — just touch it.

To select all files inside a folder, open that folder by double-clicking its icon and then press Ctrl+A or choose Organize→Select All.

After selecting multiple files or folders by any method, right-click any of the selected items.

A context menu appears.

Choose Copy

The file or folder is copied. If you selected multiple files or folders, all are copied.

Printer Setting

Opening the print settings window

Launch the HP print driver window from common Windows applications and learn how to navigate the different tabs and menus.

  1. Open the document or photo on your computer, click File or the menu icon , then click Print.

A Print or Print Pictures window or pane opens with general print job settings, including the menu to select the printer you want to print to.

  1. Open Document Properties or Printing Preferences from the main print window or pane to access the HP print driver settings. The button or link name varies depending on the app you are printing from.
  • Microsoft Word: Click Printer Properties
  • Paint and WordPad: Click Preferences
  • Windows Photo Viewer: Click Options… in the lower right corner of the screen, then click Printer Properties… in the Print Settings window
  • Adobe PDF Reader: Click Properties
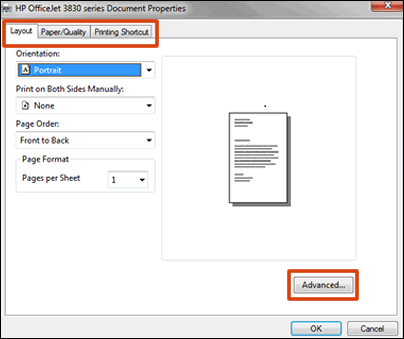
  1. To view the different settings, click the tabs along the top of the window. To access more settings, click the Advanced button that is often located on the Layout tab.

Figure : Example of a printer Document Properties window

  1. If a Printing Shortcut tab is available, click it to use shortcuts that already have essential settings already selected for common print job types. You may also create your own custom shortcut for future print jobs.

Modem Installation, Mouse Installation

  1. Make sure that your modem will work with your Internet subscription. While rare, some modems encounter issues when paired with a specific Internet company (e.g., Comcast). Double-check your modem’s compatibility with your current Internet subscription before buying (if possible).

If you find that your modem won’t work with your current subscription, try to exchange the modem for a different one that will work, or switch your Internet subscription.

  1. Find your room’s cable output. The cable output resembles a metal cylinder with a small hole in the middle and screw threads all around the sides. You’ll usually find cable outputs in the wall near the floor in living rooms and bedrooms.
  2. Decide on a place to mount the modem. The modem should be relatively high up (e.g., on top of a bookshelf), and it will need to be close enough to the cable output that you can connect it without stretching or bending the cable.
  3. Make sure that you have all of the required cables. A modem generally requires a coaxial cable to connect to the cable output, as well as a power cable to connect to an electrical outlet. Both of these cables should come with your modem, but if you bought it used, you may need to find replacement cables.
  • If you plan on attaching the modem to a router, you will also need an Ethernet cable.
  • Consider buying a longer coaxial cable if the one that you have is too short to allow you to mount properly your modem.
  1. Read your modem’s instructions. Each modem is unique, and yours may require additional setup outside of this article’s capacity. Reading your modem’s manual will help make you aware of any additional steps that you have to take to install the modem.

Part II Installing

  1. Attach one end of the coaxial cable to the cable output. The coaxial cable has a connection that resembles a needle on each end. This will plug into the cable output. Make sure that you screw the coaxial cable onto the cable outlet to ensure that the connection is solid.
  2. Attach the other end of the cable to the input on your modem. On the back of the modem, you should see an input that resembles the cable output cylinder. Attach the free end of the coaxial cable to this input, making sure to tighten as needed.
  3. Plug your modem’s power cable into an electrical outlet. A wall socket or a surge protector will do. It’s important to plug the cable into the power outlet before connecting it to the modem, since connecting the power cable to the modem first can cause damage.
  4. Insert the modem power cable’s free end into the modem. You’ll usually find the power cable input port at the bottom of the back of the modem, but check your modem’s documentation to confirm if you can’t find the power port.
  5. Place your modem in its spot. With the cables attached, gently move your modem into its designated position. You shouldn’t feel any resistance from the cables.
  6. Attach the modem to a router. If you have a Wi-Fi router that you want to use in conjunction with your modem, plug one end of an Ethernet cable into the square port on the back of the modem, then plug the other end into the “INTERNET” (or similarly labeled) square port on the back of the router. As long as the router is plugged into a power source, the router should immediately light up.
  • Give your modem and router a few minutes to boot up before attempting to connect to Wi-Fi.
  • You can also connect your computer directly to your modem via Ethernet if you have an Ethernet port enabled computer (ex. A PC or Ethernet Adapter for most Macs)

Today, almost all wired and wireless mice use USB as the interface to the computer. However, older computers may utilize PS/2 or serial ports. If your mouse is wireless, it can be communicating over Bluetooth, RF (radio frequency), or IR(infrared). To proceed, select your connection type from the list below and follow the instructions.

Connecting a wireless USB mouse

A cordless mouse has a small receiver that communicates with the mouse. The receiver connects to the computer via a USB port.

  1. Look for a USB port in the back or on the side of your computer and plug in the receiver.
  2. Once the wireless receiver is connected to the computer, Windows should automatically find and install the appropriate drivers as long as you’re connected to the Internet.
  3. Make sure there are batteries in the mouse or that it is charged.
  4. Next, verify that the mouse is turn on. Many wireless devices have an on and off switch on the bottom of them.

Connecting a wired USB mouse

Connect the USB cable coming from the mouse to one of the USB ports (shown right) on the back or side of your computer. If you are using a USB port hub, connect the mouse cable to that.

After the mouse is connected, the computer should automatically install the drivers and provide basic functionality. If the mouse you want to change how any special buttons work, additional software may need to be installed.

If the mouse is not functioning, see our mouse troubleshooting section.

Connecting a Bluetooth mouse

A Bluetooth mouse connects to a computer wirelessly using a Bluetooth signal. The computer must have built-in Bluetooth or have a Bluetooth adapter connected to it.

To connect a Bluetooth mouse to your computer, follow the steps below.

  • Open the Bluetooth utility on your computer and make sure Bluetooth is turned on. The Bluetooth utility, if enabled, can usually be found in the notification area, with an icon that looks like the Bluetooth symbol.
  • Turn on the mouse if it has an On/Off switch. Check the Bluetooth utility to see if it detects the Bluetooth mouse.
  • When the Bluetooth utility finds the Bluetooth mouse, select the mouse in the Bluetooth device list and click the Pair button.
  • If successful, the mouse will be connected to the computer.

Adding and Removing Programmes

The Add or Remove Programs is a feature in Microsoft Windows that lets a user uninstall and manage the software installed on their computer. This feature was introduced in Windows 98 as Add/Remove Programs, later renamed Programs and Features in Windows Vista and Windows 7, and then Apps & features in Windows 10.

How to open Add or Remove Programs in Windows 10?

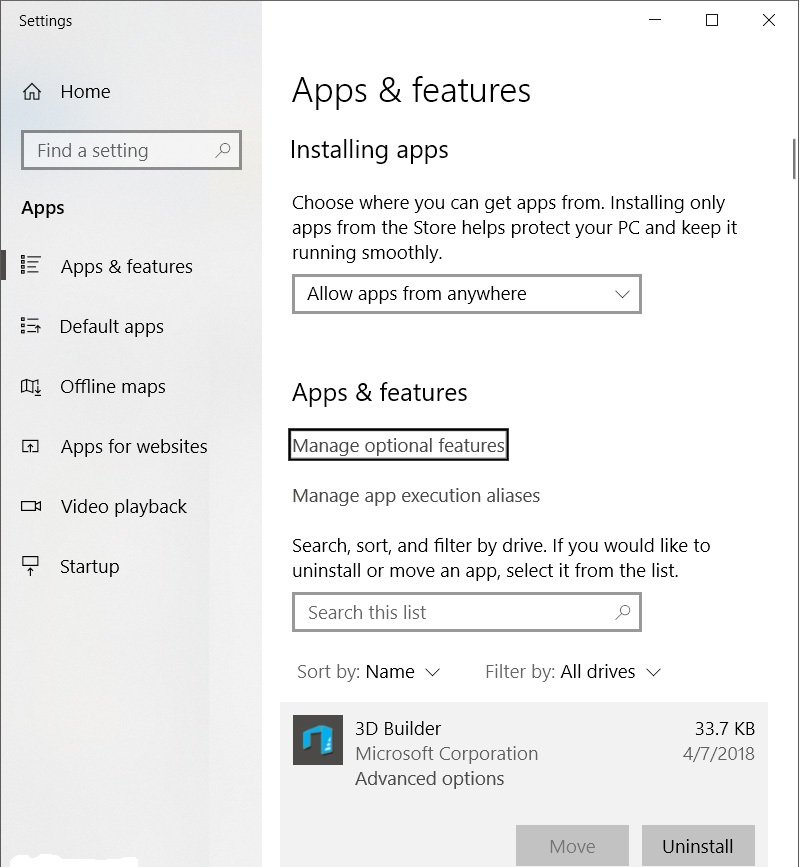
  1. Press the Windows key, type Apps & features or Add or Remove Programs, and press Enter.
  2. A window similar to the picture below should appear.

  1. From this window, you’ll be able to manage how Windows installs programs and also uninstall any programs that have been installed.

or

  1. Open the Control Panel
  2. Click Programs and Features or under the Programs section click Uninstall a program.
  3. From this window, you’ll be able to manage how Windows installs programs and also uninstall any programs that have been installed.

Open Add or Remove Programs in Windows 7 and 8

  1. Open the Control Panel
  2. Under the Programs section, click Uninstall a program.
  3. A window similar to the one shown below should appear with a list of all the programs on your computer.

4. From the Programs and Features section of Windows, you can uninstall a program, adjust Windows features, and view installed updates.

or

  1. Press the Windows key, type Programs and Features or Add and remove programs, then press Enter.
  2. A window similar to that shown above should appear.
  3. From the Programs and Features section of Windows, you can uninstall a program, adjust Windows features, and view installed updates.

Active Desktop Concept

Active Desktop was a feature of Microsoft Internet Explorer 4.0’s optional Windows Desktop Update that allowed users to add HTML content to the desktop, along with some other features. This function was intended to be installed on the then-current Windows 95 operating system. It was also included in Windows 98 and later Windows operating systems up through 32-bit XP, but was absent from XP Professional x64 Edition and all subsequent versions of Windows. Its status on XP 64-bit edition (which was not the same thing as Professional x64 Edition) and on both 32-bit and 64-bit versions of Windows Server 2003 is not widely known. This corresponded to version Internet Explorer 4.0 to 6.x, but not Internet Explorer 7.

HTML could be added both in place of the regular wallpaper and as independent resizable desktop items. Items available on-line could be regularly updated and synchronized so users could stay updated without visiting the website in their browser.

Active Desktop worked much like desktop widget technology in that it allowed users to place customized information on their desktop.

Active Desktop was a Microsoft operating system feature introduced in July 1997, coinciding with the release of Internet Explorer version 4.0. It allowed a user to integrate HTML features in their desktop, either as the desktop wallpaper, or as individual elements similar to widgets. Active Desktop could display the latest news or stock quotes, and was an example of push technology, a short-lived trend of the late 1990s. It also made it possible for animated GIFs to be used as the desktop background.

Active Desktop was first available for Windows 95, then for Windows 98 and the 32-bit version of Windows XP. It was phased out after Internet Explorer version 6.0, coinciding with the introduction of the Windows Sidebar feature in Windows Vista.

History of Active Desktop

The introduction of the Active Desktop marked Microsoft’s attempt to capitalize on the push technology trend led by PointCast. Active Desktop placed a number of “channels” on the user’s computer desktop that provided continually-updated information, such as news headlines and stock quotes, without requiring the user to open a Web browser. However, its most notable feature was that it allowed MJPGs and animated GIFs to animate correctly when set as the desktop wallpaper.

Active Desktop debuted as part of an Internet Explorer 4.0 preview release in July 1997, and came out with the launch of the 4.0 browser in September that year. for Windows 95 and Windows NT 4.0, as a feature of the optional Windows Desktop Update offered to users during the upgrade installation. While the Windows Desktop Update is commonly referred to as Active Desktop itself, it is actually an entire Windows shell upgrade from v4.0 to v4.71, or v4.72, with numerous changes to the Windows interface, resulting in an appearance and functionality level nearly indistinguishable from the then yet-to-be-released Windows 98. Features include the option to allow uppercase filenames (the old v4.0 desktop would forcibly display uppercase filenames in title case), configurable one-click hot-tracking file selection, customizable per-folder HTML display settings, QuickLaunch mini-buttons on the Taskbar next to the Start button, upgraded Start Menu allowing drag and drop item reordering and allowing right-click context menus for item renaming, etc. With the update, Windows Explorer featured an Address bar in which Internet addresses can be entered and seamlessly browsed.

Active Desktop never attained any significant degree of popularity, as its drawbacks included high use of system resources and reduction in system stability. The component was retained in Windows XP but was replaced by a feature named Windows Sidebar in Windows Vista. Sidebar in turn was called Windows Desktop Gadgets in Windows 7, which also allows components to be added to the desktop, but it was also discontinued due to security issues; Windows 8 replaced it with live tiles in the Start screen. Windows Server 2003 R2 32-bit is the most recent Microsoft operating system to support Active Desktop. It appears that the 64-bit version of Windows XP no longer supports Active Desktop. However, it still provides the option to display Web pages and channels built with Microsoft’s Channel Definition Format (CDF) on the desktop.

error: Content is protected !!