Formatting Disk, Copying Files, Printer Setting
19/03/2020Formatting Disk
Disk formatting is the configuring process of a data storage media such as a hard disk drive, floppy disk or flash drive for initial usage. Any existing files on the drive would be erased with disk formatting. Disk formatting is usually done before initial installation or before installation of a new operating system. Disk formatting is also done if there is a requirement for additional storage in the computer.
Disk formatting can be performed on both magnetic platter hard drives and solid-state drives. The formatting comprises low-level formatting, partitioning and high-level formatting. Low-level formatting aids in preparing the physical structure on the storage media. The partitioning process involves the division of the hard drive into logical volumes for data storage. High-level formatting helps in creating the file system format within the logical volume or within the disk partition. Disk formatting is usually done with the help of a disk formatting utility.
While preparing the hard drive for initial use, disk formatting checks for errors in the drive. It can scan and repair bad sectors. Another benefit associated with disk formatting is its capability to erase bad applications and remove sophisticated viruses.
Disk formatting is an action which must be done with caution. As it deletes data and removes programs installed, backup of the necessary data or applications are required. Disk formatting takes time. Frequent disk formatting can gradually decrease the life of a hard drive.
Copying Files
You can copy a file or folder (or groups of files or folders at the same time) to another location on your computer. When you do, the original file or folder stays in the same location, but a duplicate of it is copied to the location you indicate.
In Windows Explorer, select the file, folder, or groups of files and folders you’d like to copy.
You can select multiple files or folders in several ways:
Click the first file or folder you want to select, hold down the Ctrl key, and then click each additional file or folder you want. The selected files are highlighted, and the details pane displays the number of selected items. To unselect one of the selected files, click that file a second time. After selecting all your files, release the Ctrl key.

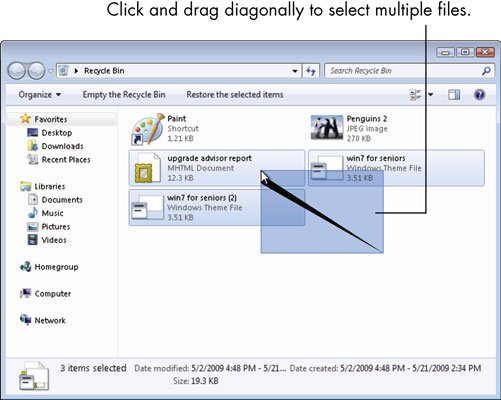
Click an empty part of the content area in Windows Explorer, hold down the left mouse button, and drag the mouse pointer towards the files you want to select. A selection box appears on-screen. Any file or folder that you touch with that selection box becomes selected. You don’t have to surround a file with the box — just touch it.

To select all files inside a folder, open that folder by double-clicking its icon and then press Ctrl+A or choose Organize→Select All.
After selecting multiple files or folders by any method, right-click any of the selected items.
A context menu appears.
Choose Copy
The file or folder is copied. If you selected multiple files or folders, all are copied.
Printer Setting
Opening the print settings window
Launch the HP print driver window from common Windows applications and learn how to navigate the different tabs and menus.
- Open the document or photo on your computer, click File or the menu icon , then click Print.
A Print or Print Pictures window or pane opens with general print job settings, including the menu to select the printer you want to print to.
- Open Document Properties or Printing Preferences from the main print window or pane to access the HP print driver settings. The button or link name varies depending on the app you are printing from.
- Microsoft Word: Click Printer Properties
- Paint and WordPad: Click Preferences
- Windows Photo Viewer: Click Options… in the lower right corner of the screen, then click Printer Properties… in the Print Settings window
- Adobe PDF Reader: Click Properties
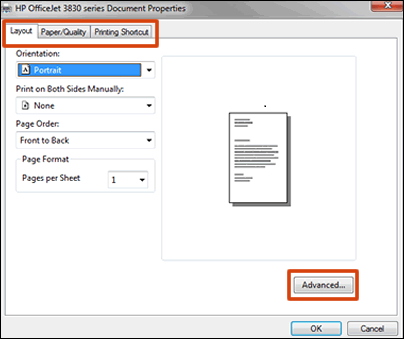
- To view the different settings, click the tabs along the top of the window. To access more settings, click the Advanced button that is often located on the Layout tab.
Figure : Example of a printer Document Properties window

- If a Printing Shortcut tab is available, click it to use shortcuts that already have essential settings already selected for common print job types. You may also create your own custom shortcut for future print jobs.