DBMS: Microsoft Access, Database

Database management system is a software which is used to manage the database. For example: MySQL, Oracle, etc. are a very popular commercial database which is used in different applications.

DBMS provides an interface to perform various operations like database creation, storing data in it, updating data, creating a table in the database and a lot more.

It provides protection and security to the database. In the case of multiple users, it also maintains data consistency.

DBMS allows users the following tasks:

  • Data Definition: It is used for creation, modification, and removal of definition that defines the organization of data in the database.
  • Data Updation: It is used for the insertion, modification, and deletion of the actual data in the database.
  • Data Retrieval: It is used to retrieve the data from the database which can be used by applications for various purposes.
  • User Administration: It is used for registering and monitoring users, maintain data integrity, enforcing data security, dealing with concurrency control, monitoring performance and recovering information corrupted by unexpected failure.

Characteristics of DBMS

  • It uses a digital repository established on a server to store and manage the information.
  • It can provide a clear and logical view of the process that manipulates data.
  • DBMS contains automatic backup and recovery procedures.
  • It contains ACID properties which maintain data in a healthy state in case of failure.
  • It can reduce the complex relationship between data.
  • It is used to support manipulation and processing of data.
  • It is used to provide security of data.
  • It can view the database from different viewpoints according to the requirements of the user.

Advantages of DBMS

  • Controls database redundancy: It can control data redundancy because it stores all the data in one single database file and that recorded data is placed in the database.
  • Data sharing: In DBMS, the authorized users of an organization can share the data among multiple users.
  • Easily Maintenance: It can be easily maintainable due to the centralized nature of the database system.
  • Reduce time: It reduces development time and maintenance need.
  • Backup: It provides backup and recovery subsystems which create automatic backup of data from hardware and software failures and restores the data if required.
  • multiple user interface: It provides different types of user interfaces like graphical user interfaces, application program interfaces

Disadvantages of DBMS

  • Cost of Hardware and Software: It requires a high speed of data processor and large memory size to run DBMS software.
  • Size: It occupies a large space of disks and large memory to run them efficiently.
  • Complexity: Database system creates additional complexity and requirements.
  • Higher impact of failure: Failure is highly impacted the database because in most of the organization, all the data stored in a single database and if the database is damaged due to electric failure or database corruption then the data may be lost forever.

Microsoft Access

Microsoft Access is a database management system (DBMS) from Microsoft that combines the relational Microsoft Jet Database Engine with a graphical user interface and software-development tools. It is a member of the Microsoft Office suite of applications, included in the Professional and higher editions or sold separately.

Microsoft Access stores data in its own format based on the Access Jet Database Engine. It can also import or link directly to data stored in other applications and databases.

Software developers, data architects and power users can use Microsoft Access to develop application software. Like other Microsoft Office applications, Access is supported by Visual Basic for Applications (VBA), an object-based programming language that can reference a variety of objects including the legacy DAO (Data Access Objects), ActiveX Data Objects, and many other ActiveX components. Visual objects used in forms and reports expose their methods and properties in the VBA programming environment, and VBA code modules may declare and call Windows operating system operations.

Database

The database is a collection of inter-related data which is used to retrieve, insert and delete the data efficiently. It is also used to organize the data in the form of a table, schema, views, and reports, etc.

For example: The college Database organizes the data about the admin, staff, students and faculty etc.

Using the database, you can easily retrieve, insert, and delete the information.

Entering Data into the Database, Creating Database Table

Microsoft Access is a database application that is a part of the Microsoft Office applications suite. Entering data into Microsoft Access isn’t difficult. Essentially, there are two ways to do that: through a datasheet view or by entering a new record on an Access form.

Datasheet View

Step 1

Double-click the table you’d like to enter data to. Table names are at the bottom of the “Create” choices.

Step 2

Wait for a table with horizontal rows and vertical columns to appear. A row is a record in your table. The left triangle on the far left indicates that the record is selected.

Step 3

Enter a new record by filing out fields right of the asterisk (the rows at the bottom). If you’d like to change the content of a cell, double-click it.

Press Ctrl+S (save the database), and your changes to the table will be saved.

Using a Form

Step 1

Click on the Forms button that is on the left of the dialog box..

Step 2

Double-click the form that corresponds with the table (it should have a similar name).

Step 3

After a new window appears, locate a button to the left of the number of records (located at the bottom of the dialog box). It looks like >*

Creating Database Table

Creating a table

A simple database, such as a contact list, might use only a single table. Many databases, however, use several tables. When you create a new database, you create a new file on your computer that acts as a container for all of the objects in your database, including your tables.

You can create a table by creating a new database, by inserting a table into an existing database, or by importing or linking to a table from another data source — such as a Microsoft Excel workbook, a Microsoft Word document, a text file, or another database. When you create a new, blank database, a new, empty table is automatically inserted for you. You can then enter data in the table to start defining your fields.

Create a new table in a new database

  1. Click File > New, and then select Blank desktop database.
  2. In the File Name box, type a file name for the new database.
  3. To browse to a different location and save the database, click the folder icon.
  4. Click Create.

The new database opens, and a new table named Table1 is created and opens in Datasheet view.

Create a new table in an existing database

  1. Click File > Open, and click the database if it is listed under Recent. If not, select one of the browse options to locate the database.
  2. In the Open dialog box, select the database that you want to open, and then click Open.
  3. On the Create tab, in the Tables group, click Table.

A new table is inserted in the database and the table opens in Datasheet view.

Importing or linking to create a table

You can create a table by importing or linking to data that is stored elsewhere. You can import or link to data in an Excel worksheet, a SharePoint list, an XML file, another Access database, a Microsoft Outlook folder, and more.

When you import data, you create a copy of the data in a new table in the current database. Subsequent changes to the source data will have no effect on the imported data, and changes to the imported data do not affect the source data. After you connect to a data source and import its data, you can then use the imported data without connecting to the source. You can change the design of an imported table.

When you link to data, you create a linked table in the current database that represents a live link to the existing information that is stored elsewhere. When you change data in a linked table, you are changing it in the source. Whenever data changes in the source, that change is shown in the linked table. You must be able to connect to the data source whenever you use a linked table. You cannot change the design of a linked table.

Records and Shorting Records

Access gives you the ability to work with enormous amounts of data, which means it can be difficult to learn anything about your database just by glancing at it. Sorting and filtering are two tools that let you customize how you organize and view your data, making it more convenient to work with. In this lesson, you’ll learn how to sort and filter records.

Sorting Records

When you sort records, you are putting them into a logical order, with similar data grouped together. As a result, sorted data is often simpler to read and understand than unsorted data. By default, Access sorts records by their ID numbers. However, there are many other ways records can be sorted. For example, the information in a database belonging to a bakery could be sorted in a number of ways:

Orders could be sorted by order date or by the last name of the customers who placed the orders.

Customers could be sorted by name or by the city or zip code where they live.

Products could be sorted by name, category (like pies, cakes, and cupcakes), or price.

You can sort both text and numbers in two ways: in ascending order and descending order. Ascending means going up, so an ascending sort will arrange numbers from smallest to largest and text from A to Z. Descending means going down, or largest to smallest for numbers and Z to A for text. The default ID number sort that appears in your tables is an ascending sort, which is why the lowest ID numbers appear first.

In our example, we will be performing a sort on a table. However, you can sort records in any Access object. The procedure is largely the same.

To sort records:

  1. Select a field you want to sort by. In this example, we will sort by customers’ last names.

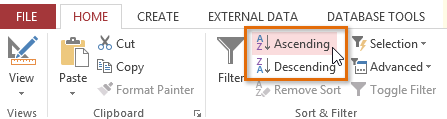
2. Click the Home tab on the Ribbon, and locate the Sort & Filter group.

3. Sort the field by selecting the Ascending or Descending command.

  • Select Ascending to sort text A to Z or to sort numbers from smallest to largest. We will select this in our example because we want the last names to be in A-to-Z order.
  • Select Descending to sort text Z to A or to sort numbers from largest to smallest.

  1. The table will now be sorted by the selected field

  1. To save the new sort, click the Save command on the Quick Access toolbar.

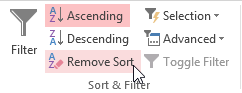
After you save the sort, the records will stay sorted this way until you perform another sort or remove the current one. To remove a sort, click the Remove Sort command.

Querying a Database

We query data every day from Google searches to asking Siri for a funny joke. Queries are simply questions against a set of data. They can become very complex, involving multiple tables and millions of records; however, the basic concept is straightforward and not very complex.

A database query is a request for data from a database. Usually the request is to retrieve data; however, data can also be manipulated using queries. The data can come from one or more tables, or even other queries.

Example

As mentioned above, when we ask Siri for a joke, we are posing a question/query to the application. While the query behind the scenes is very complex and will search against many sources, the concept can be made quite simple.

A query starts with the keyword SELECT, no matter the system. This tells the database to go pick something; the details are after the SELECT statement. If we want all jokes, we use the asterisk (*), which tells the database to retrieve everything:

Query Working

Let’s say that you want to order an Americano at Starbucks. You make a request by saying “Can I have an Americano?”. The Barista will understand the meaning of your request and give you the ordered item.

A query works the same way. It gives meaning to the code used in any query language. Be it SQL or anything else, both the user and the database can always exchange information as long as they ‘speak’ the same language.

You may now think that placing a query is the only way to request data. In fact, quite a few database software options let you use other methods. The most popular ones are:

  1. Using available parameters

The software, by default, has lists of parameters on their menu. Users can choose one, and the system will then guide you to produce the desired output. It’s easy, but not flexible and offers limited operations.

  1. Query by example

The system will show you a set of code with some blank areas, in which you can write and specify the fields and values of your data.

  1. Query language

This is what we’ve been talking about. You have to write the queries from scratch whenever you want to manipulate data. This method requires understanding the query language used by your database software. Although it is complex, it gives you full control over your data.

Generating Reports in Database

A database report is the formatted result of database queries and contains useful data for decision-making and analysis.

Most good business applications contain a built-in reporting tool; this is simply a front-end interface that calls or runs back-end database queries that are formatted for easy application usage. For example, a banking software application may contain specifically defined reports on all customers with large deposits or reports on monthly loan summaries for all customers.

To extract data, a query must be run with various tools that call at least one query language. Structured Query Language (SQL) is the most popular and well-known query language. Other query languages include:

  • Hyper Text Structured Query Language (HTSQL): This language translates hypertext transfer protocol (HTTP) queries to SQL.
  • Poliqarp Query Language: This language searches annotated text.
  • SPARQL (a recursive acronym for SPARQL Protocol and RDF Query Language): This language is for graphing applications.

Another standard reporting feature is the ability to create output parameters or restrictions. For example, when a user runs a monthly loans summary report, the user first enters the specific month or account type associated with the requested report. Specialized reporting tools not typically available via simple queries may be connected to a database to facilitate additional reporting capabilities. These often offer greater data insight and highlight trends and patterns, and are frequently labeled under the buzzword “business intelligence” (BI).

Steps

  1. Open the Navigation pane.
  2. Click the table or query on which you want to base your report.
  3. Activate the Create tab.
  4. Click the Report button in the Reports group. Access creates your report and displays your report in Layout view. You can modify the report.

Application Software: Word Processing Software

Application software is a program or group of programs designed for end users. These programs are divided into two classes: system software and application software. While system software consists of low-level programs that interact with computers at a basic level, application software resides above system software and includes applications such as database programs, word processors and spreadsheets. Application software may be bundled with system software or published alone.

Application software may simply be referred to as an application.

Different types of application software include:

  • Application Suite: Has multiple applications bundled together. Related functions, features and user interfaces interact with each other.
  • Enterprise Software: Addresses an organization’s needs and data flow in a huge distributed environment
  • Enterprise Infrastructure Software: Provides capabilities required to support enterprise software systems
  • Information Worker Software: Addresses individual needs required to manage and create information for individual projects within departments
  • Content Access Software: Used to access content and addresses a desire for published digital content and entertainment
  • Educational Software: Provides content intended for use by students
  • Media Development Software: Addresses individual needs to generate and print electronic media for others to consume.

Word Processing Software

Word processing software is used to manipulate a text document, such as a resume or a report. You typically enter text by typing, and the software provides tools for copying, deleting and various types of formatting. Some of the functions of word processing software include:

  • Creating, editing, saving and printing documents.
  • Copying, pasting, moving and deleting text within a document.
  • Formatting text, such as font type, bolding, underlining or italicizing.
  • Creating and editing tables.
  • Inserting elements from other software, such as illustrations or photographs
  • Correcting spelling and grammar

Word processing includes a number of tools to format your pages. For example, you can organize your text into columns, add page numbers, insert illustrations, etc. However, word processing does not give you complete control over the look and feel of your document. When design becomes important, you may need to use desktop publishing software to give you more control over the layout of your pages.

Word processing software typically also contains features to make it easier for you to perform repetitive tasks. For example, let’s say you need to send a letter to all your customers regarding a new policy. The letter is the same for all customers except for the name and address at the top of the letter. A mail merge function allows you to produce all the letters using one template document and a table with customer names and addresses in the database.

Text editors shouldn’t be confused with word processing software. While they do also allow you to create, edit and save text documents, they only work on plain text. Text editors don’t use any formatting, such as underlined text or different fonts. Text editors serve a very different purpose from word processing software. They are used to work with files in plain text format, such as source code of computer programs or configuration files of an operating system. An example of a text editor would be Notepad on the Windows platform.

Microsoft Word (Entering Text, Formatting, Editing, Headers and Footers, Column and Section Page Layout, Thesaurus, Replace, Cut and Paste)

Microsoft Word (or simply Word) is a word processor developed by Microsoft. It was first released on October 25, 1983.

Sometimes called Winword, MS Word, or Word, Microsoft Word is a word processor published by Microsoft. It is one of the office productivity applications included in the Microsoft Office suite. Originally developed by Charles Simonyi and Richard Brodie, it was first released in 1983.

Microsoft Word is available for Microsoft Windows, Apple macOS, Android, and Apple iOS. It can also run on the Linux operating system using WINE.

What is Microsoft Word used for?

Microsoft Word allows you to create professional-quality documents, reports, letters, and résumés. Unlike a plain text editor, Microsoft Word has features including spell check, grammar check, text and font formatting, HTML support, image support, advanced page layout, and more.

What are the uses of Microsoft Word?

Microsoft Word is a word processor, and, like other word processors, it’s capable of helping users create a variety of different types of documents. For example, users can create a résumé, business contract, instruction document, or a letter to another person. We’ve included a list of the top uses of a word processor on our word processor page.

How many lines are there on a page in Microsoft Word?

By default, there are 29 lines on one page in Microsoft Word.

What type of files can Microsoft Word create and use?

Early versions of Microsoft Word primarily created and used the .doc file extension, while newer versions of Word create and use the .docx file extension.

More recent versions of Microsoft Word can create and open the following types of files:

  • .doc, .docm, .docx
  • .dot, .dotm, .dotx
  • .htm, .html
  • .mht, .mhtml
  • .odt
  • .pdf
  • .rtf
  • .txt
  • .wps
  • .xps
  • .xml

1. Entering Text – Microsoft Word

Document area is the area where you type your text. The flashing vertical bar is called the insertion point and it represents the location where the text will appear when you type. keep the cursor at the text insertion point and start typing the text. We typed only two words “Hello Word” as shown below.

The following are the two important points that will help you while typing −

  • You do not need to press Enter to start a new line. As the insertion point reaches the end of the line, Word automatically starts a new one. You will need to press Enter, to add a new paragraph.
  • When you want to add more than one space between words, use the Tab key instead of the spacebar. This way you can properly align text by using the proportional fonts.

2. Formatting in Microsoft Word

Formatting text in Microsoft Word involves tasks like bolding the text, italicising it, and changing the font and size. The commands to perform all of these formatting tasks are found on the Home tab in the Font group. Select your text and then click on the required formatting button to see the effects.

Alternatively, you can use the keyboard shortcuts for those commands. Here are the shortcuts for some of the more commonly used formatting commands:

  • Bold: ctrl-b
  • Italic: ctrl-i
  • Underline: ctrl-u

You can also set the formatting before you type by clicking the appropriate button or using the shortcut, and then anything you subsequently type will be formatted. To unset the formatting, you click the same command button or use the same shortcut.

3. Editing

Step I: Open your document to begin editing. If you’re unsure about your editing skills, save an extra copy under the name “DocumentName-edit” so that your document stays in its original format. Edit the new version. If you like your changes, rename the document afterwards.

Step II: Delete single letters one at a time. Place the cursor to the right of the letters to be erased and press the “Backspace” key or place the cursor to the left and press the “Delete” key. Continue pressing the key until all the letters are gone.

Step III: Erase entire words, sentences, paragraphs, or pages. Highlight the text you want to delete by either dragging the mouse to highlight the text, or by holding down the shift key and using the arrows. Once the text is highlighted, press “Backspace” or “Delete” to erase the text.

4. Headers and Footers

Headers and footers are typically used in multiple-page documents to display descriptive information. In addition to page numbers, a header or footer can contain information such as: The document name, the date and/or time you created or revised the document, an author name, a graphic, a draft or revision number.

This descriptive information can appear in many different combinations. For example, the second page of a business letter typically contains a header with the name of the addressee, the page number, and the date. A report can contain a footer with the report name and a header with the page number and chapter name. A newsletter can contain a header with a title and logo on the first page and a footer with the title and page number on the pages that follow. Adjust your Headers and Footers via the “Header and Footer” selection on the View dropdown menu on the Menu toolbar.

5. Column and Section Page Layout

The layout of your pages can have a big impact on how they’re read, and layouts, used well, allow you to position text, images, macros, charts, and much more, to have the best visual impact.

There are two ways to modify the layout of a Confluence page:

  • Use page layouts to add sections and columns
  • Use macros to add sections and columns.

Page layouts provide a simple, visual representation of your page layout in the editor, while the macros are more flexible and allow for greater complexity in your layout.

To add a section:

Choose the Page Layout button in the toolbar

The Page Layout toolbar appears.

Choose Add Section

The new section appears below your current content, with the boundaries of the section(s) indicated by dotted lines (the dotted lines aren’t visible when you view the page).

To change the column layout in a section:

  • Place your cursor in the section you wish to change
  • Choose a layout from the page layout toolbar (for example, two columns or three columns)

Any text, images or macros in your section are not lost when you change the column layout. When you decrease the number of columns, Confluence will move your content to the left. When you increase the number of columns, Confluence will add blank columns to the right of your existing content.

To move a section to another part of the page:

  • Place your cursor in the section you wish to move
  • Choose the Move up or Move down buttons

The section and all of its content will be moved above or below other sections on the page.

To delete a section:

  • Place your cursor in the section you wish to remove
  • Choose Remove section

The section and all of its content will be removed.

6. Spelling and Grammar Checkers

Microsoft Word comes with built-in spell checker and grammar checker. It also offers robust support for dictionaries.

Given we now produce so much content in a digital format, the tools are useful. You’re much more likely to make spelling errors when using a keyboard rather than a pen.

The tools work automatically most of the time, but there are many ways to customize them. For example, you can use AutoCorrect to speed up your typing. And the dictionary menus are packed with clever features and hidden options.

7. Thesaurus in Microsoft Word

In addition to the spell checking and grammar checking tools that Microsoft Word offers, there is also the Word thesaurus we can take advantage of to improve our documents. Using the thesaurus, you can find synonyms (different words with the same meaning) and antonyms (words with the opposite meaning).

In Microsoft Office Word you can look up a word quickly if you right-click anywhere in your document, and then click Synonym on the shortcut menu.

Thesaurus in Word now: click Review > Proofing > Thesaurus. The Research pane opens on the right hand side of the workspace.

Type in a word into the Search for box and press Enter. Alternatively, press ALT on the keyboard and click a word in your document. Word displays a list of alternatives that you can use. If you find a word in the list that you’d like to use, click on the down arrow that appears to the right and select Insert.

If you had selected a word in your document, the word you select in the Research pane will replace it. If not, the word will simply be inserted into your document where the cursor was positioned.

If you want to continue your research and look up further synonyms for another word in the list, click on it. That word will be placed in the Search for box and its synonyms will be displayed in the list.

8. Replace, Cut and Paste

Cutting, copying, and pasting are three of the most basic features available to a computer user, but as you might expect Microsoft Word gives you more options than just those. There’s a built-in Office clipboard that’s pretty powerful, the ability to choose the format of content you paste, and more. Here’s how it all works.

Paste Text the Way You Want

When you paste text using Ctrl+V, Word defaults to pasting both the text and any formatting applied to that text. This means that the text will look like it did in the original location. Technically, Word copies the formatting marks in the text, which can be interpreted in different ways. This is why you might find that text copied from a website can appear much larger in Word; the formatting marks are interpreted differently by Word than they are by your web browser.

Instead of hitting Ctrl+V, you can click Home > Paste to see some different options.

The “Paste” drop-down menu shows a few options as icons across the top. From left to right these are:

  • Keep Source Formatting: This is the default option you get when pressing Ctrl+V, as described above.
  • Merge Formatting: This command pastes just the text you’ve copied but changes the formatting to match the surrounding text into which you’re pasting.
  • Picture: This command inserts the text as a picture.
  • Keep Text Only: This command removes all formatting from the original text. The text will take on the default formatting of the paragraph into which you insert the text.

There are also a couple of other options on the “Paste” drop-down menu. The “Paste Special” command lets you paste whatever you’ve copied as a special document type. For example, you could paste as a Word document, picture, or even HTML. The options available in the Paste Special window change depending on what you’ve copied. If you copied text, for example, you could insert it as a separate Word document. If you copied an image, you can change the format of the image when you paste (which we’ll talk more about in the next section).

The “Set Default Paste” option lets you change the default paste action (when you press Ctrl+V) if you don’t want “Keep Source Formatting” to be the default.

Copy Formatting and Apply it to Other Text

You’ve got your formatting set just so, and now you want various other parts of your document to look the same. It would be a pain to have to change each block of text to match manually, so Word provides the Format Painter tool to help. Format Painter copies the formatting from selected text and then pastes it into other text. If you select an entire paragraph, it copies the paragraph formatting. If you select just a few words of text, it copies any character formatting applied to that text.

Select the text with the formatting you want to copy, hit Home > Format Painter and then select the text to which you want to paste the formatting. If you want to paste formatting to multiple locations, select the text and then double-click the “Format Painter” button. Anything you click or select after that gets pasted with the original formatting, and you can click the “Format Painter” button again to turn it off.

Tables and Formatting Tables

Creating a table in Word 2019

Tables organize text into rows and columns, which can make the text easy to type, edit, and format while spacing it correctly in your document. Tables organize text into cells, where a cell is the intersection of a row and a column.

Word provides four ways to create a table:

  • Click the Insert tab, click the Table icon, and then highlight the number of rows and columns for your table (up to a maximum of eight rows and ten columns).
  • Use the Insert Table dialog box.
  • Draw the size and position of the table with the mouse.
  • Convert existing text (divided by a delimiter character such as a tab or a comma).

Creating a table by highlighting rows and columns in Word 2019

Creating a table by highlighting rows and columns can be fast, but it limits the size of your table to a maximum of eight rows and ten columns. To create a table by highlighting rows and columns, follow these steps:

  1. Click the Insert tab.
  2. Move the cursor where you want to insert a table in your document.
  3. Click the Table icon.

A pull-down menu appears.

  1. Move the mouse pointer to highlight the number of rows and columns you want to create for your table.

When you highlight rows and columns, Word displays your table directly in your document so you can see exactly what your table will look like.

  1. Click the left mouse button when you’re happy with the size of your table.

Creating a table in Word 2019 with the Insert Table dialog box

Creating a table by highlighting the number of rows and columns can be fast, but it limits the size of your table to a maximum of eight rows and ten columns. To create a table by defining a specific number of rows and columns (up to a maximum of 63 columns), follow these steps:

  1. Click the Insert tab.
  2. Move the cursor where you want to insert a table.
  3. Click the Table icon.

A pull-down menu appears.

  1. Click Insert Table.

The Insert Table dialog box appears.

  1. Click in the Number of Columns text box and type a number between 1 and 63, or click the up or down arrow to define the number of columns.
  2. Click in the Number of Rows text box and type a number or click the up or down arrow to define the number of rows.
  3. In the AutoFit Behavior group, select one of the following radio buttons:
  • Fixed Column Width: Defines a fixed size for the column widths, such as 0.3 inches
  • AutoFit to Contents: Defines the width of a column based on the width of the largest item stored in that column
  • AutoFit to Window: Expands (or shrinks) the table to fit within the current size of the document window
  1. Click OK.

Word draws the table in your document.

  1. Creating a table in Word with the mouse

Drawing a table can be especially useful when you want to place a table in the middle of a page and create rows and columns of different sizes.

To draw a table in your Word document, follow these steps:

  1. Click the Insert tab.
  2. Click the Table icon.

A pull-down menu appears.

  1. Click Draw Table.

The mouse pointer turns into a Pencil icon.

  1. Move the mouse pointer where you want to draw your table, hold down the left mouse button, and drag the mouse to draw your table.

Word draws a rectangular dotted box to show where your table will appear.

  1. Release the left mouse button when you’re happy with the size and position of your table.
  2. Draw the boundaries for your table’s rows and columns:
  • To draw vertical lines in your table, move the mouse pointer to the top or bottom of the table, hold down the left mouse button, and drag the mouse up and down.
  • To draw horizontal lines in your table, move the mouse pointer to the left or right side of the table, hold down the left mouse button, and drag the mouse right and left to draw.
  1. Press Esc or double-click to turn the mouse pointer from a Pencil icon back to an I-beam pointer.

Mails Merge Style and Templates

You can create a MS Word Mail Merge template that can then be uploaded into Wealthbox to print letters or other documents with fields inserted from Wealthbox. Note: be sure you save the Word file as a document, not a template format.

  1. Open MS Word and choose a new document or an existing document that you would like to use as a Mail Merge template.
  2. Click the “Insert” tab from the Menu bar and choose “Field” from the “Quick Parts” list.
  3. Choose “Mail Merge” from the “Categories” list.
  4. Select “MergeField” from the “Field names” list.
  5. Within the “Field Properties” section, enter a Mail Merge field in the “Field name” box. Click here to see the available Mail Merge fields from Wealthbox.
  6. Click “OK.”

NOTE: Copying and pasting the allowed Mail Merge fields will not work properly when conducting a Mail Merge within Wealthbox. The above steps are necessary when creating your templates within MS Word.

MS Word for PC example:

Operating System, Concepts, Objectives, Functions, Types and Importance

Operating System (OS) is a system software that acts as an interface between the user and computer hardware. It manages all hardware resources and provides a platform on which application software runs. Without an operating system, a computer cannot function properly. Examples of operating systems include Windows, Linux, macOS, and UNIX.

The operating system performs essential tasks such as process management, memory management, file management, device management, and security control. It allocates CPU time to programs, manages main memory, controls input–output devices, and maintains files and folders on storage devices. In business environments, operating systems ensure smooth multitasking, data security, and efficient utilization of system resources. A reliable operating system improves productivity by enabling users to run multiple applications, communicate over networks, and perform business operations efficiently.

Examples of Operating Systems

  • Microsoft Windows: Known for its user-friendly GUI, Windows dominates personal and business desktops.
  • Linux: Open-source and versatile, Linux is popular for servers, developers, and enthusiasts.
  • macOS: Developed by Apple, macOS offers seamless integration with Apple devices and a secure environment.
  • Android: The most widely used mobile OS, known for its customization and vast app ecosystem.
  • iOS: Apple’s mobile OS, offering high security, fluid user experience, and exclusive features.

Objectives of Operating System

  • Convenience to Users

One of the primary objectives of an operating system is to make the computer system easy and convenient to use. It provides a user-friendly interface through graphical or command-based systems, allowing users to interact with the computer without understanding hardware complexities. By managing tasks automatically, the operating system enables users to perform computing activities efficiently and comfortably.

  • Efficient Utilization of Hardware Resources

The operating system aims to ensure the optimum use of hardware resources such as CPU, memory, storage devices, and input–output devices. It allocates resources to different programs in a balanced manner to avoid wastage. Efficient resource utilization improves system performance and ensures smooth execution of multiple tasks.

  • Process Management

An important objective of the operating system is process management. It controls the execution of programs by scheduling processes, allocating CPU time, and handling multitasking. The operating system ensures that multiple programs can run simultaneously without conflict, maintaining system stability and performance.

  • Memory Management

Memory management is a key objective of an operating system. It manages the allocation and deallocation of main memory to programs and processes. The operating system ensures that each program gets sufficient memory and prevents unauthorized access, thereby improving system efficiency and preventing memory-related errors.

  • File Management

The operating system provides a systematic method for storing, organizing, and retrieving files. It manages file creation, deletion, access permissions, and directory structures. Efficient file management ensures data security, quick access, and proper utilization of storage resources, which is essential in business environments.

  • Device Management

Another objective of the operating system is to manage input and output devices such as printers, keyboards, and monitors. It acts as an intermediary between hardware devices and users, ensuring proper communication and efficient use of peripherals through device drivers.

  • Security and Protection

The operating system aims to provide security and protection for data and system resources. It controls user access, protects files from unauthorized use, and prevents system misuse. Security features such as passwords and access controls are crucial for safeguarding sensitive business information.

  • Error Detection and System Control

The operating system continuously monitors the system to detect errors in hardware or software. It handles system failures gracefully and provides error messages for corrective action. This objective helps maintain system reliability and ensures uninterrupted computer operations.

Functions of an Operating System

  • Process Management

Process management is a core function of an operating system. It controls the execution of programs by creating, scheduling, and terminating processes. The operating system allocates CPU time to different processes to enable multitasking. It also handles process synchronization and prevents conflicts, ensuring smooth and efficient execution of multiple applications at the same time.

  • Memory Management

Memory management involves managing the computer’s main memory. The operating system allocates memory to programs when they are executed and frees it after completion. It ensures efficient utilization of memory and prevents programs from accessing each other’s memory space. This function improves system performance and stability.

  • File Management

File management allows the operating system to organize data into files and directories. It manages file creation, deletion, naming, storage, and access permissions. This function ensures that data is stored systematically and can be retrieved easily. File management also protects data from unauthorized access and accidental loss.

  • Device Management

The operating system manages input and output devices such as keyboards, printers, and scanners. It communicates with hardware through device drivers and controls device operations. Device management ensures efficient and fair use of peripherals by multiple programs and users.

  • Storage Management

Storage management involves handling secondary storage devices such as hard disks and SSDs. The operating system organizes data on storage devices and manages free space. It ensures data is stored securely and accessed efficiently, supporting large volumes of business data.

  • Security and Protection

Security is an important function of an operating system. It protects system resources and data through user authentication, passwords, and access controls. The operating system prevents unauthorized access and ensures data confidentiality, which is essential for business operations.

  • User Interface Management

The operating system provides a user interface, such as a graphical user interface (GUI) or command-line interface (CLI). This allows users to interact with the computer easily. A good interface improves usability and productivity.

  • Error Detection and Handling

The operating system detects hardware and software errors and takes corrective actions. It provides error messages and logs for troubleshooting. This function ensures system reliability and minimizes downtime.

Types of Operating Systems

1. Batch Operating System

Batch operating system is designed to handle jobs in batches without requiring user interaction during execution. Users submit jobs, which are collected and processed sequentially by the system. Each job includes input data, program instructions, and output requirements. Batch OS improves CPU utilization by minimizing idle time between jobs. It is mostly used in large-scale data processing tasks, such as payroll, billing, and scientific calculations. The main limitation is the lack of interaction with users during processing, meaning errors cannot be corrected immediately. Examples include early IBM mainframes using IBSYS.

2. Time-Sharing Operating System

Time-sharing operating system (TSOS) allows multiple users to interact with the computer simultaneously. The CPU divides time into small slices and allocates them to different tasks, enabling concurrent processing. Each user feels they have dedicated access to the system. TSOS improves system responsiveness and ensures efficient utilization of resources. It is widely used in educational institutions, laboratories, and offices where multiple users require simultaneous access. Examples include UNIX, Multics, and modern versions of Windows Server.

3. Multiprogramming Operating System

Multiprogramming operating system allows multiple programs to reside in memory at the same time. The CPU switches between programs to maximize resource utilization and minimize idle time. It ensures continuous processing, as when one program waits for I/O operations, the CPU can execute another program. Multiprogramming is particularly effective in large organizations and data centers handling multiple tasks simultaneously. Limitations include complexity in scheduling and memory management. Examples include IBM OS/360 and early mainframe operating systems.

4. Multitasking Operating System

Multitasking operating system enables a single user to execute multiple programs simultaneously. It allocates CPU time to each program efficiently, giving the user the impression that all tasks are running at the same time. Multitasking OS improves productivity and resource utilization. Modern desktop operating systems like Windows, macOS, and Linux are multitasking systems. They allow users to browse the internet, run software applications, and download files concurrently. Limitations include high CPU and memory requirements to manage multiple tasks effectively.

5. Multi-User Operating System

Multi-user operating system allows multiple users to access the computer system at the same time through different terminals. It provides resource sharing, process scheduling, and security controls for each user. Multi-user OS is ideal for servers, enterprise applications, and mainframes where multiple users require simultaneous access to resources. Examples include UNIX, Linux, and Windows Server. Challenges include ensuring security, preventing unauthorized access, and managing CPU and memory allocation efficiently.

6. Real-Time Operating System (RTOS)

Real-time operating system processes data and executes tasks within a predetermined time limit. RTOS is critical in environments where immediate response is essential, such as industrial automation, medical equipment, aviation, and defense systems. It ensures predictability and reliability in time-sensitive applications. RTOS can be hard real-time, where missing a deadline is catastrophic, or soft real-time, where occasional delays are acceptable. Examples include VxWorks, QNX, and RTLinux. Limitations include high complexity and cost.

7. Distributed Operating System

Distributed operating system manages multiple computers connected over a network and makes them appear as a single unified system. It provides resource sharing, load balancing, and fault tolerance, improving efficiency and reliability. Distributed OS is widely used in cloud computing, data centers, and large organizations for collaborative processing. Examples include Amoeba, Plan 9, and LOCUS. Challenges include network dependency, synchronization, and maintaining data consistency across multiple nodes.

8. Network Operating System

Network operating system (NOS) provides services and manages resources for computers connected in a network. It controls file sharing, printer access, security, and communication among networked computers. NOS is used in offices, schools, and enterprises to ensure centralized management and collaboration. Examples include Novell NetWare, Windows Server, and UNIX/Linux server editions. Limitations involve higher installation costs, maintenance requirements, and dependency on network infrastructure.

9. Embedded Operating System

Embedded operating system is designed for devices with specific functions and limited hardware resources. It is used in smartphones, ATMs, appliances, and IoT devices. Embedded OS focuses on efficiency, real-time operation, and reliability rather than general-purpose functionality. Examples include Android (for embedded devices), FreeRTOS, and Windows Embedded. Limitations include restricted flexibility, minimal user interface, and dependency on hardware specifications.

Importance of Operating Systems

  • Resource Management

Operating systems are crucial for managing computer resources such as CPU, memory, storage, and input/output devices. They allocate resources efficiently among various applications and processes, ensuring optimal performance. Proper resource management prevents conflicts, reduces idle time, and improves system reliability, which is essential for businesses relying on continuous computing operations.

  • User Convenience

Operating systems provide a user-friendly interface, such as graphical or command-line interfaces, making computers easy to operate. Users can interact with hardware without needing detailed technical knowledge. This convenience improves productivity and reduces learning time, allowing both individuals and organizations to perform tasks efficiently.

  • Multitasking and Multiprogramming

Operating systems allow multitasking and multiprogramming, enabling multiple applications to run simultaneously. This ensures that the CPU is utilized effectively and reduces waiting time for processes. In business environments, multitasking improves workflow, supports concurrent tasks, and enhances overall productivity.

  • Security and Protection

An operating system provides security measures such as user authentication, access control, and data protection. It prevents unauthorized access to sensitive files and system resources. Security features are critical for businesses to protect confidential data, maintain compliance, and safeguard against cyber threats.

  • File and Storage Management

Operating systems manage file systems and storage devices, organizing data into files and directories. This ensures easy retrieval, systematic storage, and efficient space utilization. Proper file management is essential for maintaining business records, databases, and other digital assets securely.

  • Hardware and Device Management

Operating systems act as intermediaries between hardware devices and software applications. They manage peripherals such as printers, scanners, and keyboards, ensuring smooth communication and proper functioning. Effective device management improves operational efficiency and prevents hardware conflicts.

  • Error Detection and System Reliability

Operating systems constantly monitor hardware and software to detect errors. They provide alerts, logs, and corrective measures to maintain system reliability. Reliable error detection reduces downtime, which is vital for businesses that require uninterrupted computing services.

  • Networking and Communication

Modern operating systems facilitate networking and communication between computers and devices. They manage data exchange, network security, and resource sharing, enabling collaboration in offices, enterprises, and remote work environments. Efficient networking support enhances productivity and connectivity.

error: Content is protected !!